How to Do Acrylic Nails at Home (Step-by-Step)
Acrylic nails are one of the most durable and versatile nail enhancements available, but they also have the steepest learning curve for DIY application. Unlike gel or dip powder systems that offer more working time, acrylic requires you to work with a liquid-and-powder mixture that begins hardening immediately after application.
Doing acrylic nails at home is entirely achievable, but it demands patience, proper preparation, and a clear understanding of the technique. Your first few attempts will take longer and look less refined than a salon set. This is normal. With practice, you will develop the muscle memory and timing needed to create beautiful, long-lasting acrylic nails.
This comprehensive guide walks you through everything you need to know from the tools and products required to the precise steps for application, troubleshooting common mistakes, and maintaining your finished set.
What You Will Need to Do Acrylic Nails at Home
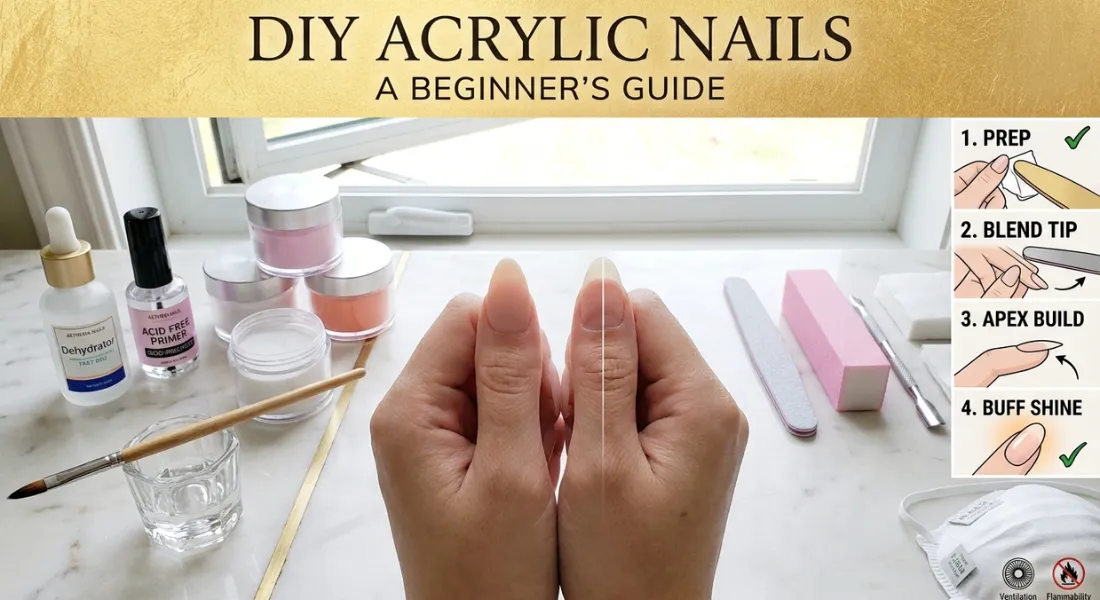
Before you begin, gather all necessary supplies. Having everything within reach is essential since you will need to work quickly once the acrylic is mixed.
Essential Tools and Products
| Item | Purpose |
|---|---|
| Acrylic liquid monomer | Reacts with powder to form the acrylic bead |
| Acrylic powder | Available in clear, pink, white, and colored options |
| Nail tips (for length) | Plastic extensions glued to the natural nail |
| Nail glue | Bonds tips securely to the natural nail |
| Dehydrator | Removes surface oils for better adhesion |
| Primer | Etches the nail plate to promote bonding |
| Acrylic application brush | Size #6 or #8 round brush is ideal for beginners |
| 180-grit file | For shaping and blending |
| 240-grit buffer | For smoothing the surface |
| Buffing block | For final shine and refinement |
| Cuticle pusher | Gently pushes back the proximal nail fold |
| Isopropyl alcohol (99%) | For cleaning the brush and wiping the nail surface |
| Lint-free wipes | For applying alcohol without leaving fibers |
| Dust mask | Protects from inhaling acrylic dust during filing |
| Well-ventilated workspace | Near an open window or with a fan running |
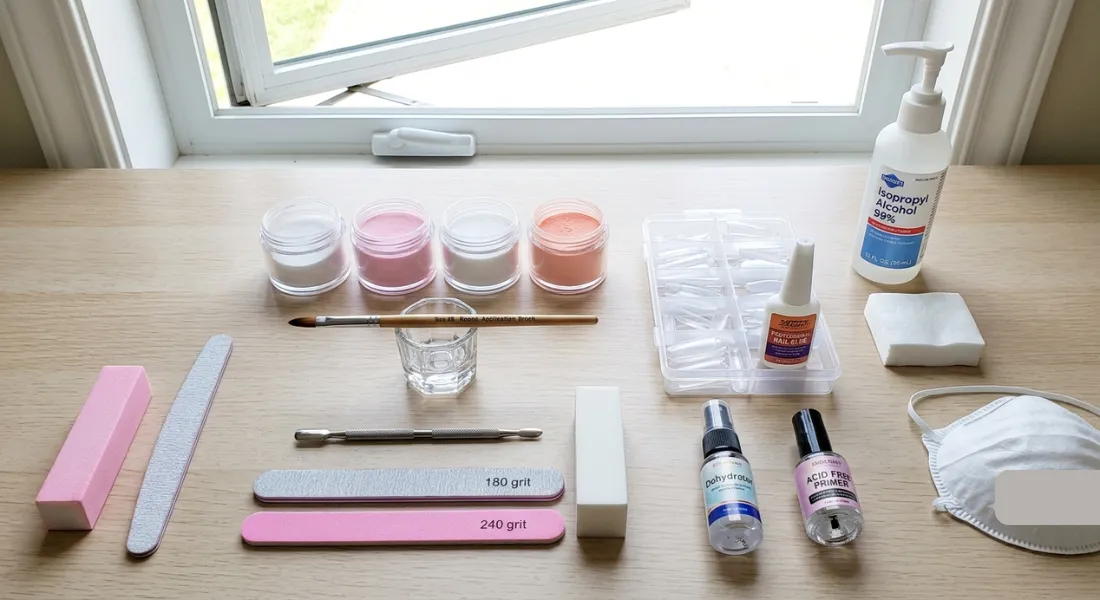
Choosing the Right Monomer: EMA vs. MMA
Not all acrylic monomers are created equal. EMA (Ethyl Methacrylate) is the industry standard and is safe for use on natural nails. MMA (Methyl Methacrylate) is a cheaper alternative that is illegal in many countries due to its hardness, which prevents proper adhesion and can cause severe nail plate damage.
Expert Warning: Never use MMA-based products. They are often sold under unbranded or suspiciously cheap labels. If the powder smells unusually sweet or the product is extremely difficult to file, it may contain MMA. Always purchase from reputable beauty supply brands.
Step-by-Step: How to Do Acrylic Nails at Home
Follow these steps in precise order for the best results. Skipping any stage can compromise adhesion and longevity.
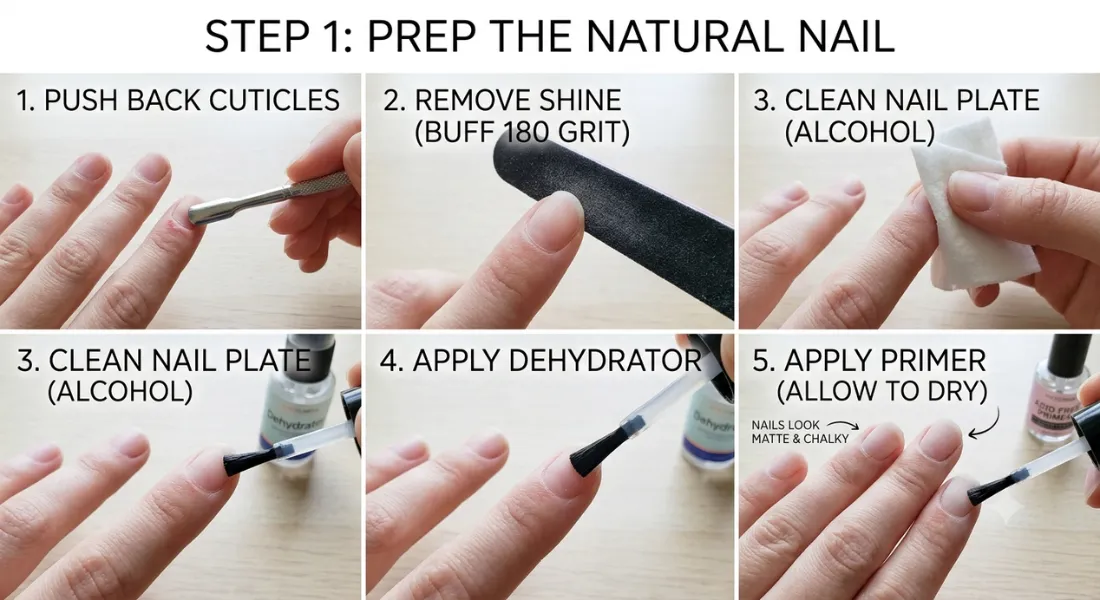
Step 1: Prep the Natural Nail
Proper preparation is the single most important factor in preventing lifting.
Push back cuticles: Gently push back the proximal nail fold using a cuticle pusher. Do not cut the cuticle—this can lead to infection.
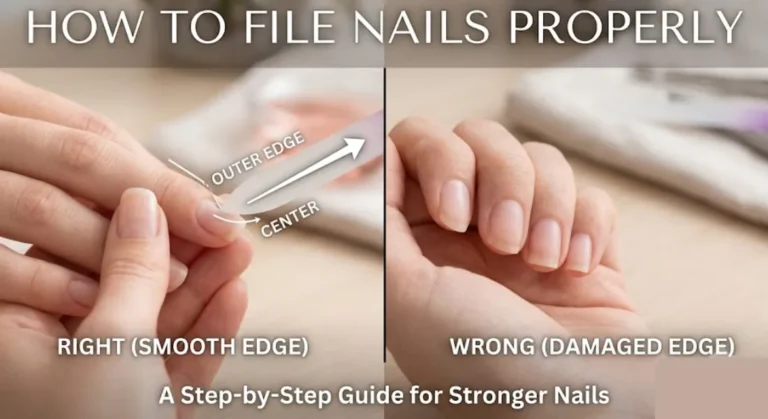
Remove shine: Lightly buff the natural nail surface using a 180-grit file. File in one direction only to create texture. This step removes the natural oils and creates micro-scratches for the acrylic to grip.
Clean the nail plate: Wipe the nail with isopropyl alcohol on a lint-free wipe to remove all dust and debris.
Apply dehydrator: Brush a thin layer of dehydrator onto the natural nail. This evaporates any remaining moisture and surface oils.
Apply primer: Apply a thin layer of primer. This creates a chemical bond between the natural nail and the acrylic. Allow it to dry completely before proceeding. The nail should look matte and chalky.
Step 2: Apply Nail Tips (If Adding Length)
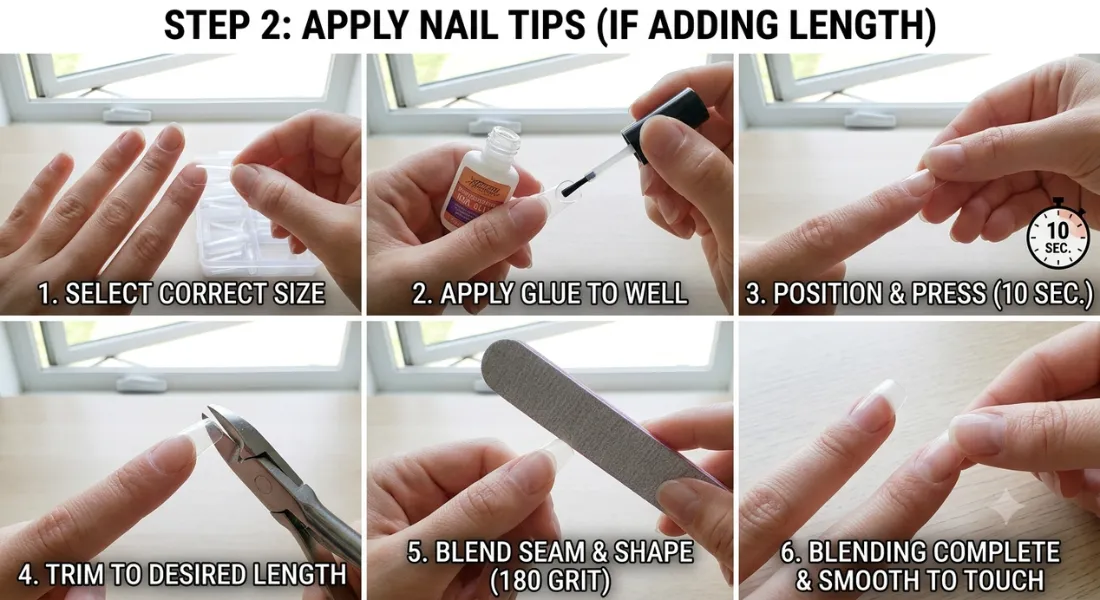
If you want extended length, apply tips before the acrylic.
Select the correct size: Choose a tip that fits the entire width of the natural nail without overlapping the sidewalls.
Apply glue: Apply a small amount of nail glue to the well of the tip.
Position and press: Place the tip at a 45-degree angle against the free edge. Press down firmly and hold for 10 seconds to ensure a strong bond.
Trim and shape: Once all tips are applied, use a tip cutter to trim them to your desired length. Then, use a 180-grit file to shape the tip and blend the seam where the tip meets the natural nail. The transition should feel completely smooth to the touch.
Step 3: Master the Acrylic Bead
The bead is the mixture of liquid monomer and powder. Getting the ratio right is the core skill of acrylic application.
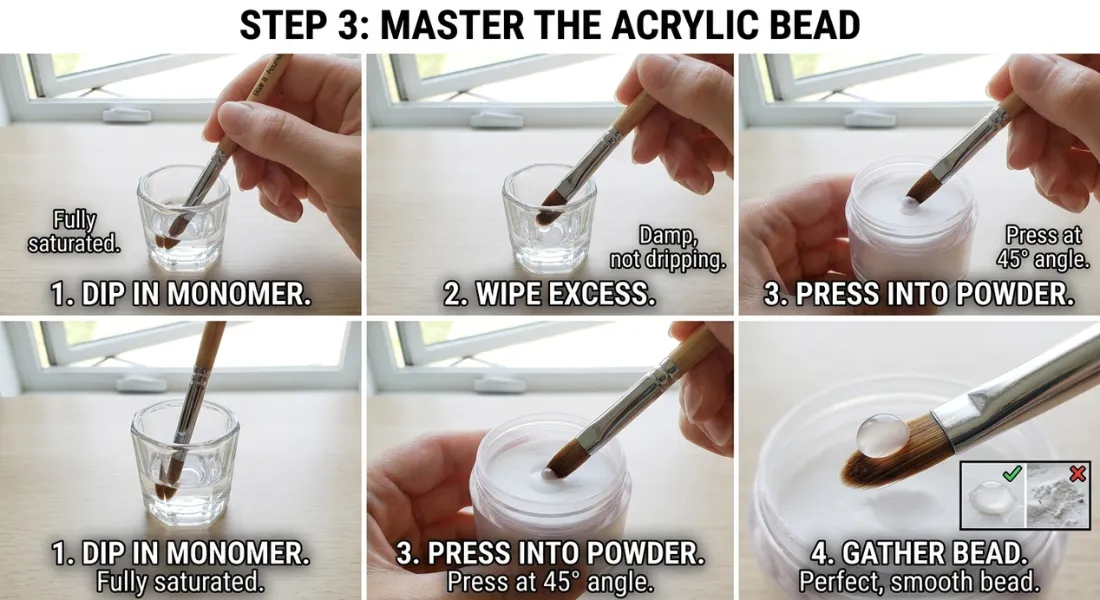
How to pick up the correct bead:
Dip the brush into the monomer until the bristles are fully saturated.
Wipe the excess monomer against the side of the dappen dish. The brush should be damp, not dripping.
Gently press the damp brush into the acrylic powder at a slight angle. You will see a bead form on the brush tip.
Roll the bead onto the brush, gathering it into a smooth, rounded ball.
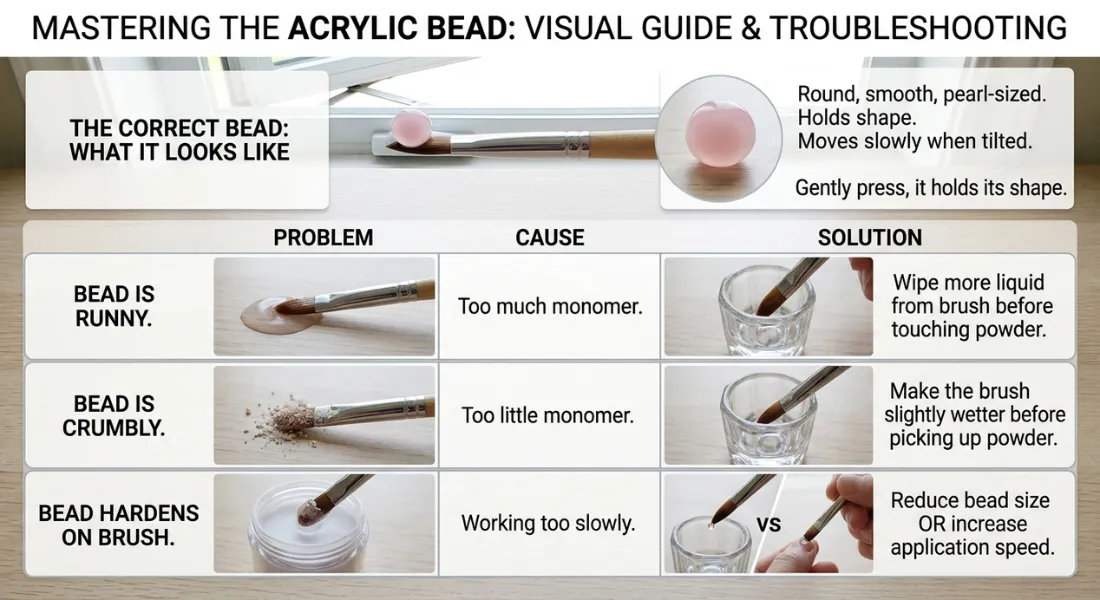
What a correct bead looks like:
The bead should be round, smooth, and about the size of a small pearl.
It should move slowly if you tilt the brush—not runny or watery.
When pressed slightly, it should hold its shape rather than flatten completely.
Incorrect beads and how to fix them
| Problem | Cause | Solution |
|---|---|---|
| Bead is runny | Too much monomer | Wipe more liquid from the brush before touching the powder |
| Bead is crumbly | Too little monomer | Make the brush slightly wetter before picking up powder |
| Bead hardens on the brush | Working too slowly | Reduce the bead size or increase your application speed |
Step 4: Apply the Acrylic to the Nail
This is where speed and precision meet. You will learn to place the bead and sculpt it before it hardens.
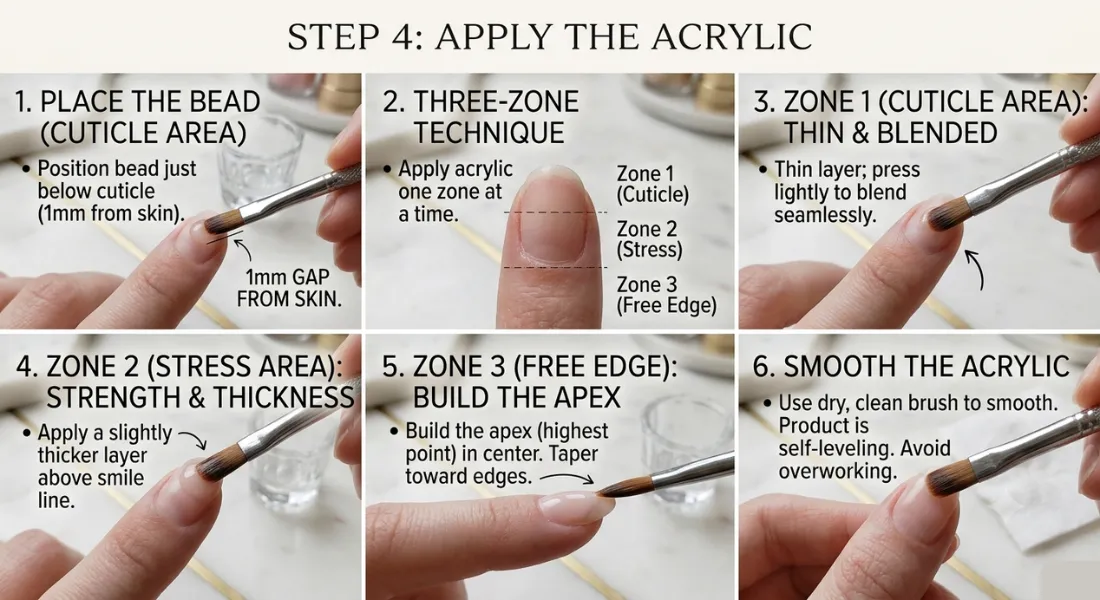
Place the bead: Position the bead just below the cuticle area (about 1mm away from the skin) and gently press it toward the free edge. The product should flow into shape rather than being dragged.
Use the “three-zone” technique:
Zone 1 (Cuticle area): Thin layer; press lightly to blend seamlessly into the natural nail.
Zone 2 (Stress area): Apply a slightly thicker layer. This is the area just above the natural smile line, where the nail is most likely to bend or break.
Zone 3 (Free edge): Build the apex (the highest point of the nail) in the center, tapering toward the edges and tip.
Smooth the acrylic: Use the brush (dipped in monomer and wiped almost dry) to gently smooth the surface. The product is self-leveling to a degree, so avoid overworking it.
Work in sections: Apply acrylic to one nail at a time, or to half the nail for better control. Complete the full set before filing.
Step 5: The Apex—Why It Matters
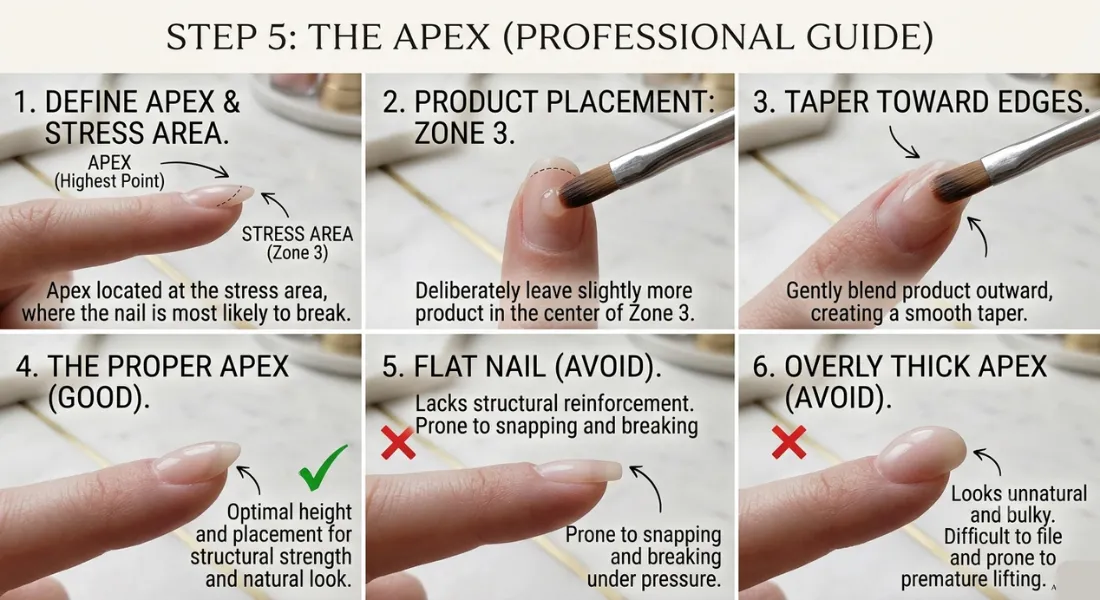
The apex is the highest point of the acrylic nail, located at the stress area. A properly built apex prevents the nail from breaking under pressure.
How to build it: When applying Zone 3, deliberately leave slightly more product in the center of the nail, tapering it toward the edges.
What to avoid: Flat nails with no apex are prone to snapping. Overly thick apexes look unnatural and bulky.
Step 6: File and Shape the Nails
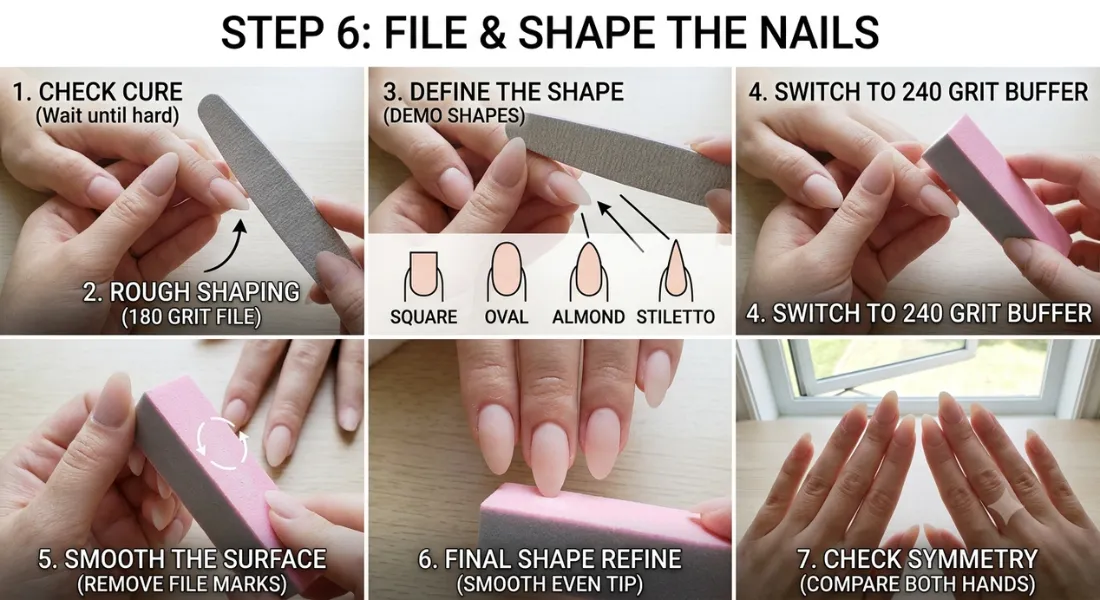
Wait until the acrylic is fully hard before filing. The surface will feel solid, but full curing takes up to 24 hours.
Rough shaping: Use a 180-grit file to shape the nails. Work in one direction to avoid lifting the acrylic.
Define the shape: Square, oval, almond, or stiletto—file the free edge to your desired shape.
Smooth the surface: Switch to a 240-grit buffer to remove any visible file marks and create an even, smooth surface.
Check symmetry: Compare nails on both hands to ensure consistent length and shape.
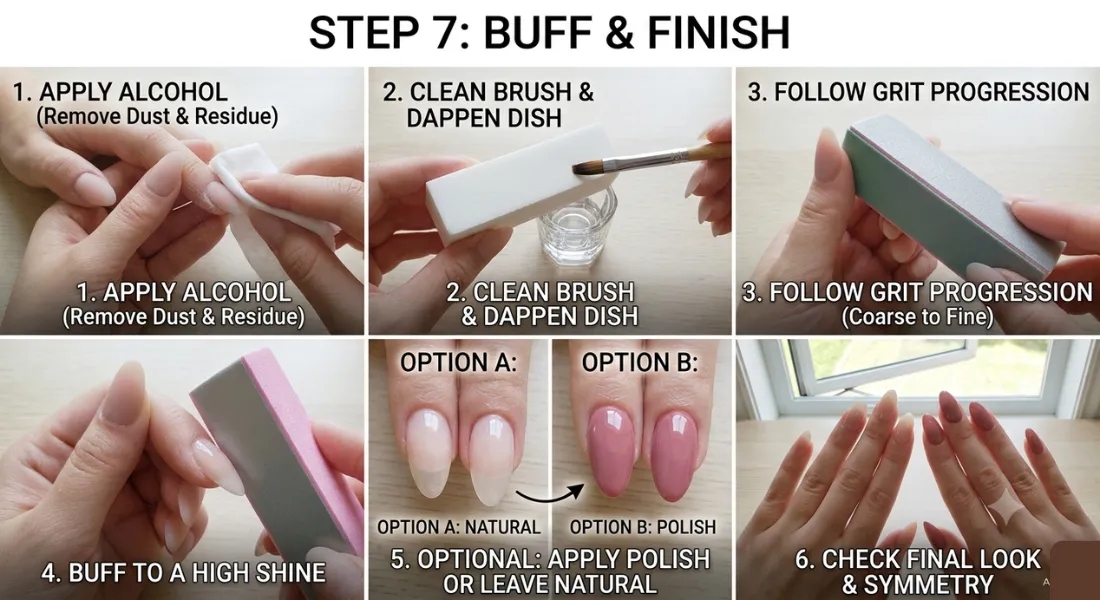
Step 7: Buff and Finish
Apply alcohol: Wipe the nails with 99% isopropyl alcohol to remove dust and any residual monomer.
Buff to a shine: Use a buffing block (following the grit progression from coarse to fine) to add a natural gloss.
Apply polish (optional): Apply a base coat, color, and top coat for a colorful finish. Alternatively, leave the acrylic natural for a clean, clear look.
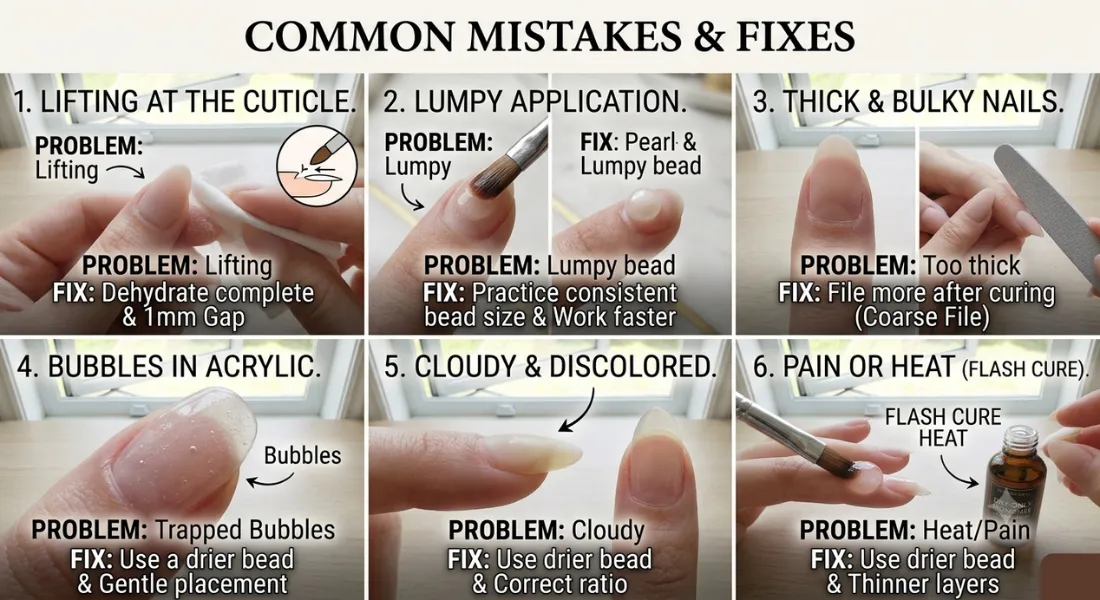
Common Mistakes First-Timers Make (And How to Fix Them)
| Mistake | Why It Happens | How to Fix It |
|---|---|---|
| Lifting at the cuticle | Acrylic touched the skin or prep was incomplete | Keep product 1mm away from the cuticle. Ensure complete dehydration before applying primer |
| Lumpy, uneven application | Bead hardened before placement, or bead size was inconsistent | Work faster or use smaller beads. Practice on tips until you master the pace |
| Nails look thick and bulky | Insufficient filing after curing | Spend more time shaping after the acrylic hardens. Use a coarse file to reduce bulk |
| Bubbles in the acrylic | Bead was too wet or applied too aggressively | Use a drier bead. Place the bead gently and let it flow rather than pressing hard |
| Cloudy or discolored acrylic | Moisture contamination or improper ratio | Ensure nails are perfectly dry before application. Check your liquid-to-powder ratio |
| Pain or heat during application | Bead was too wet or placed too thickly | Use a drier bead and work in thinner layers. The heat is normal but should subside quickly |
Realistic Expectations for Your First Attempt
Professional nail technicians spend months or years perfecting acrylic application. It is entirely reasonable for a first home attempt to take two to three hours and still look noticeably less polished than a salon set.
This is not a sign of failure—it is a sign of learning. Each attempt builds muscle memory and familiarity with the material. By your third or fourth set, you will notice significant improvement in speed, consistency, and overall finish.
Practicing on Nail Tips First
Many beginners find it helpful to purchase a set of inexpensive practice tips and apply acrylic to them before working on their own nails. This removes the pressure of making mistakes on your actual hands and allows you to focus purely on technique.
Safety Considerations When Working with Acrylic
Acrylic products are safe when used correctly, but they require respect.
1- Ventilation
Acrylic liquid monomer has a strong odor. Always work in a well-ventilated area, preferably near an open window or with a small fan directed away from your face. Prolonged exposure to fumes can cause headaches and respiratory irritation.
2- Skin Contact
Minimize skin contact with both monomer and powder. Repeated exposure can lead to contact dermatitis or allergic reactions. If product gets on the skin, wipe it off immediately with alcohol before it hardens.
3- Flammability
Monomer is flammable. Keep it away from open flames, candles, and heat sources.
4- Dust Mask
When filing cured acrylic, wear a dust mask. Inhaling acrylic dust can irritate the respiratory system.
5- Disposal
Never pour leftover monomer or powder down the sink. Both can harden and cause plumbing blockages. Dispose of them in sealed containers with regular waste.
Caring for Your Brushes
Acrylic brushes are expensive and require proper care.
Clean immediately: After each session, wipe the brush thoroughly with monomer or brush cleaner until no residue remains.
Store flat: Always store brushes flat or with the bristles pointing downward. Storing them upright can cause monomer to seep into the ferrule and loosen the bristles.
Never leave brushes in monomer: This will ruin the bristles and cause them to splay.
Storing Leftover Acrylic Supplies
Monomer: Store in a cool, dark place with the cap tightly sealed. Exposure to light and air degrades the product.
Powder: Keep sealed in a dry environment. Check for clumping before use—this indicates moisture contamination.
How Long Do Acrylic Nails Last?
With proper application and care, acrylic nails last two to three weeks before requiring a fill. At this point, the natural nail grows out, creating a gap at the cuticle that needs filling. Attempting to fill at home requires practice; many beginners choose to remove and reapply a new full set instead.
Final Checklist Before You Start
- Workspace is well-ventilated
- All tools and products are within reach
- Natural nails are prepped (dehydrated and primed)
- Tips are blended smoothly (if using)
- Brush is cleaned and ready
- You have allowed 2–3 hours for your first attempt
- You have a dust mask available for filing
Acrylic nails are a durable, customizable enhancement that you can successfully apply at home. The process requires preparation, precision, and patience. Master the bead, build the apex, and don’t rush the filing stage. Your first set will not be your best, but each attempt moves you closer to salon-quality results.
Key takeaways:
Prep is 70% of success. Never skip dehydration and priming.
Master the bead ratio. It is the foundation of the entire application.
Build the apex. It prevents breakage and ensures structural integrity.
Work in a ventilated space. Safety is non-negotiable.
Practice. Skill improves with every set.
With the right technique and realistic expectations, you can achieve stunning acrylic nails at home—saving time, money, and gaining a rewarding creative skill in the process.
Frequently Asked Questions
Can I do acrylic nails at home without any prior experience?
Yes. The learning curve is steep, but the skill is teachable. Start with a practice set and expect your results to improve significantly by the third attempt.
How long does a home acrylic application take for a first-timer?
Expect two to three hours for a full set. Professionals complete the same process in 45–60 minutes, but speed comes only with repetition.
Is it cheaper to do acrylics at home than at a salon?
The initial kit costs roughly the equivalent of one or two salon visits. Over several months of regular use, DIY acrylics become significantly more cost-effective.
How do I remove home-applied acrylic?
Soak the nails in 100% acetone for 15–20 minutes. The acrylic will soften and can be gently scraped off. Never pick or peel acrylic off—this damages the natural nail plate.
What is the biggest difference between doing acrylic nails at home versus at a salon?
Beyond skill level, the primary difference is speed. Professionals work efficiently through years of experience. A home attempt genuinely takes longer at every stage, from prep to final shaping.